You spot the leak in the worst place, under a kitchen sink, along a garage wall, or in a line that's already leaving a damp mark on drywall. The instinct is to smear on something quick and hope it holds, but with PVC, the key question is whether you're dealing with a tiny surface leak, a bad fitting, or a section that's already telling you the pipe system is tired.
In Las Vegas homes, that decision matters even more. Hard-water scale, shifting desert soil, and old tie-ins to cast iron can turn a simple drip into a repeat problem, so how to fix PVC pipe starts with figuring out what failed, not just sealing the wet spot. The right repair today can keep the leak gone for years, while the wrong one just buys you another call to the hardware store.
Table of Contents
- A Small PVC Leak Is Usually Telling You a Bigger Story
- Diagnose the Pipe Before You Touch a Wrench
- Temporary Fixes That Buy You Time
- The Cut-Out and Solvent-Weld Repair Step by Step
- When a Section Fix Is Not Enough
- Las Vegas-Specific Conditions That Change the Repair
- Your Final PVC Repair Checklist and Next Step
A Small PVC Leak Is Usually Telling You a Bigger Story
A homeowner usually calls after seeing water under a sink, a stain on a garage wall, or a wet patch near a slab edge. The leak looks small, but the pipe didn't fail in isolation. It failed because something upstream, downstream, or around the line put stress on it.
Three paths usually make sense
A tiny leak gives you three real choices. You can do a temporary patch if you need to contain the water for a short window, you can cut out and replace the damaged section if the pipe is sound everywhere else, or you can call a licensed plumber for partial repiping when the line is showing broader wear.
The mistake I see most often is treating every PVC leak like the same problem. A pinhole on an exposed drain line is one thing, a joint under a slab is another, and a brittle fitting in a garage is something else entirely. If the surrounding pipe is already scaled, sun-faded, or stressed by movement, the leak is often just the first visible failure.
Practical rule: if the pipe around the leak looks healthy and the problem is isolated, a section repair may make sense. If the surrounding pipe looks tired, the fix needs to be bigger.
Las Vegas makes this easier to misread. Hard-water scale can build inside pipes, and desert soil movement can stress fittings until they open up again. That's why the method you choose now decides whether you're done with the leak or just postponing the same call.
Diagnose the Pipe Before You Touch a Wrench
Start by finding the exact failure point, not just the wettest spot. A leak at a coupling, a crack in straight pipe, and a seep at a wall penetration do not get repaired the same way. If you guess wrong, you'll waste time, wet more material, and sometimes make the repair harder to reach.
Check the pipe, the pressure, and the access
Look at the pipe surface first. Crazing, yellowing, UV brittleness, and scale deposits tell you more than the drip rate does, because they show whether the pipe is still flexible enough to hold a solvent-weld repair or whether it's already deteriorating. Then confirm the water is fully shut off at the nearest isolation valve or main, and make sure the line is safe to open.
Accessibility changes the repair path too. A leak behind a wall, under a slab, or in a cramped crawlspace can rule out some DIY fixes even if the pipe itself is technically repairable. If the area can't be dried, aligned, and held steady while the joint cures, a quick patch is usually a bad bet.
If the pipe is under pressure, wet, buried, or boxed in, the repair gets more complicated fast.
For homeowners trying to locate the problem without opening everything up, a professional leak search is often the cleaner move. MG Plumbing Services LLC offers water leak detection for exactly that kind of hidden failure.
Temporary Fixes That Buy You Time
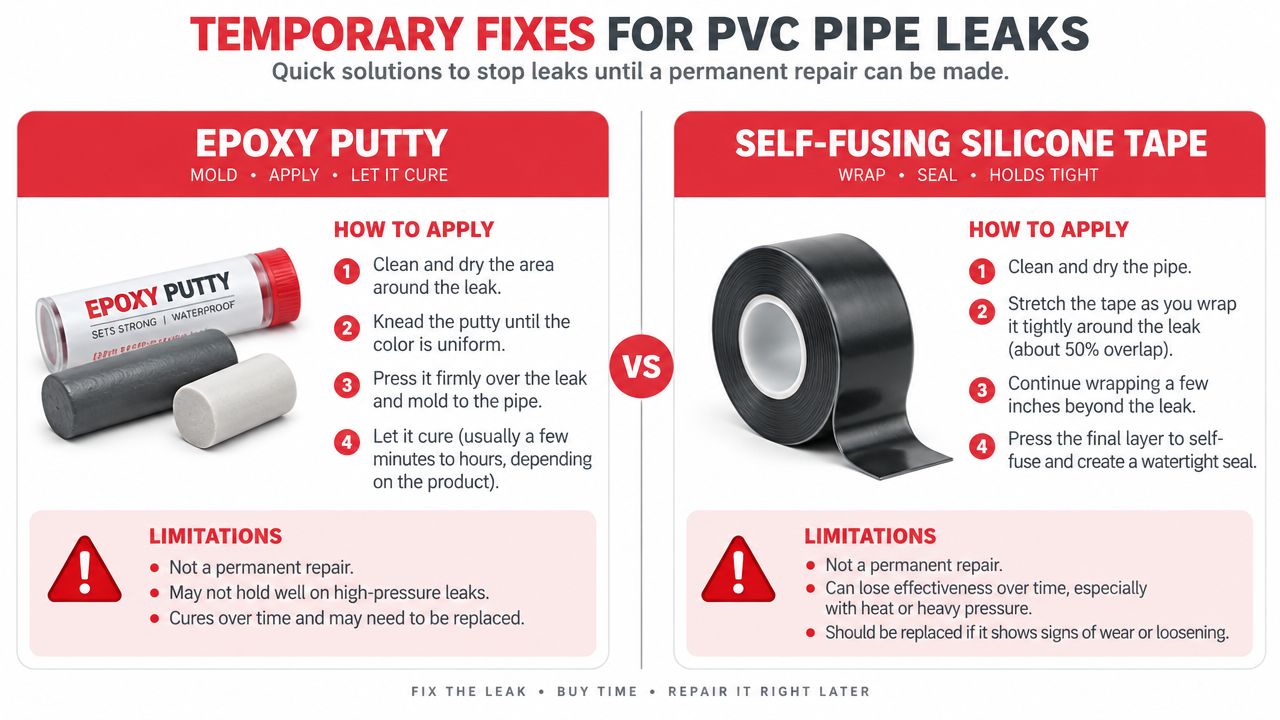
Temporary fixes have a place, but that place is containment, not completion. If you need to stop active dripping long enough to get the water shut off, get parts, or schedule the actual repair, then a short-term patch can make sense. If you expect it to behave like a permanent solvent-weld repair, you're setting yourself up for another leak.
What these stopgaps actually do
Epoxy putty can work on a cleaned, dried surface when you need to bridge a small leak or pinhole. Loctite's guidance notes its putty can be applied even when PVC is wet and can be forced into place for a functional cure in about 60 minutes, with full cure in 24 hours, which makes it useful as an emergency containment method on certain wet repairs. That still doesn't make it the right answer for a cracked solvent-weld joint or a line that's already moving.
Self-fusing silicone repair tape is better for small leaks on accessible pipe where you can wrap it with full overlap and create compression around the damaged spot. It's a containment method, not a structural repair, and it struggles on splits at fittings or on surfaces that can't be kept clean enough for a tight wrap.
Clamp sleeves and rubber patch bands can buy time on straight runs, especially where you've got enough room to install them squarely. They don't solve a failed joint, and they're a poor match for buried leaks, pressurized hot water lines, or cracks at a socket.
For a quick visual overview of temporary containment, MG Plumbing Services also keeps video resources that help homeowners understand the difference between a stopgap and a real fix.
The Cut-Out and Solvent-Weld Repair Step by Step
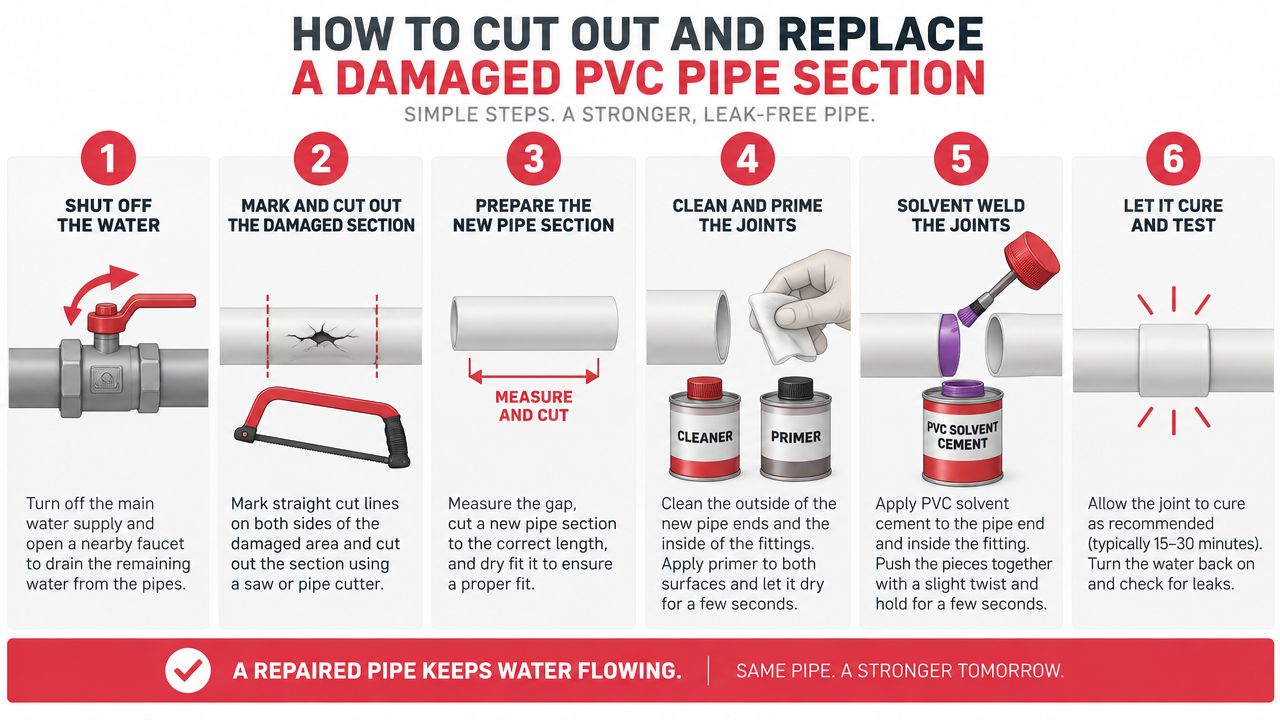
A proper PVC repair is usually a cut-out and replacement job, not a smear-and-hope job. The goal is to remove every damaged inch, connect to sound pipe, and give the new joint time to chemically fuse before pressure returns. That's the correct answer to how to fix PVC pipe when the problem is a cracked section or a failed fitting.
Build the new joint the right way
First, shut off the upstream valve and confirm the line is free of pressure. Mark your cuts a little beyond the damaged area, then cut square with a ratchet cutter or fine-tooth saw. Deburr both the inside and outside edges, because rough edges weaken alignment and can interfere with the solvent weld.
Dry-fit the replacement section with the correct couplings before you open the cement. If the pipe doesn't line up cleanly, stop and fix the layout first. A joint that has to be forced into place is a joint that's already under stress.
Field rule: clean, dry, oil-free surfaces matter. If there's water, dirt, or residue on the pipe, the bond is weaker from the start.
Use purple primer where the fitting and cement require it, let it flash briefly, then apply PVC cement in the right sequence, fitting socket first and pipe second. Push the pipe fully to the socket stop, give it a slight quarter-turn, and hold it steady so it doesn't push back out while the softened surfaces re-form.
Small-diameter work, especially 1/2-inch to 1-inch line repairs, is the part a careful DIYer can sometimes manage. Once you're up at 2 inches and above, the fittings get heavier, the alignment gets less forgiving, and I'd rather see a pro handle it. The embedded repair video below is useful, but the cure window still matters more than the demonstration itself.
When a Section Fix Is Not Enough
A section repair is the right answer when the rest of the line is still healthy. If the pipe around it is cracking, chalking, or showing repeated failure, the repair becomes a bandage. That's when homeowners should start thinking about partial repiping instead of another isolated patch.
| Scope | Typical Cost | Expected Lifespan | Best Fit |
|---|---|---|---|
| Section Fix | Not assigned in the verified data for a precise number | Can hold for years when the rest of the pipe is sound | One crack, one bad fitting, one clean repair point |
| Partial Repipe | Not assigned in the verified data for a precise number | Better when the line has repeated weak spots | Multiple problem areas on one run |
| Full Repipe | Not assigned in the verified data for a precise number | Best when the system has widespread age or material issues | Broad failure, mixed materials, recurring leaks |
Four signs the repair is too small
Multiple leaks in a short span mean the line is aging as a system, not as one isolated defect. Visible brittleness or UV chalking on exposed pipe means the material itself is losing its resilience. Repeated slab leaks from the same run point to movement below the pipe, and tie-ins to aging cast iron or galvanized sections can make the PVC repair only part of the problem.
If that's the situation, a section swap won't cure the underlying issue. In those cases, homeowners in the valley should look at targeted repiping or a fuller diagnosis, and a same-day assessment from a local plumber can keep the damage from spreading. MG Plumbing Services LLC handles same-day plumber calls during business hours for exactly these kinds of decisions.
Las Vegas-Specific Conditions That Change the Repair
Las Vegas plumbing doesn't behave like plumbing in a mild, wet climate. Hard water, soil movement, older home construction, and strong sun exposure all change what a PVC repair needs to survive. A fix that works in a laundry room in another city can fail faster here if you ignore the local conditions.
What changes the odds locally
Hard water leaves scale on the inside of pipes and fixtures, and that buildup narrows the path water travels through. When a new repair ties into a scaled line, you're not starting from a clean system, so the repair may be sound while the surrounding pipe keeps creating problems. Soil movement is the other big one, because shifting ground stresses fittings and joints, especially on slab work.
Aging cast-iron tie-ins matter in older homes, too. The leak often isn't in the PVC at all, it's in the transition point where new pipe meets old pipe. Outdoor PVC has its own problem, UV exposure can make it brittle enough that a solvent-weld repair won't have a dependable surface to grab.
In this market, the repair scope often grows because the rest of the system tells you more is wrong than the leak first showed.
That's why homes in Las Vegas, Henderson, North Las Vegas, Summerlin, and the rest of the valley need repair decisions based on the actual house, not a generic PVC scenario.
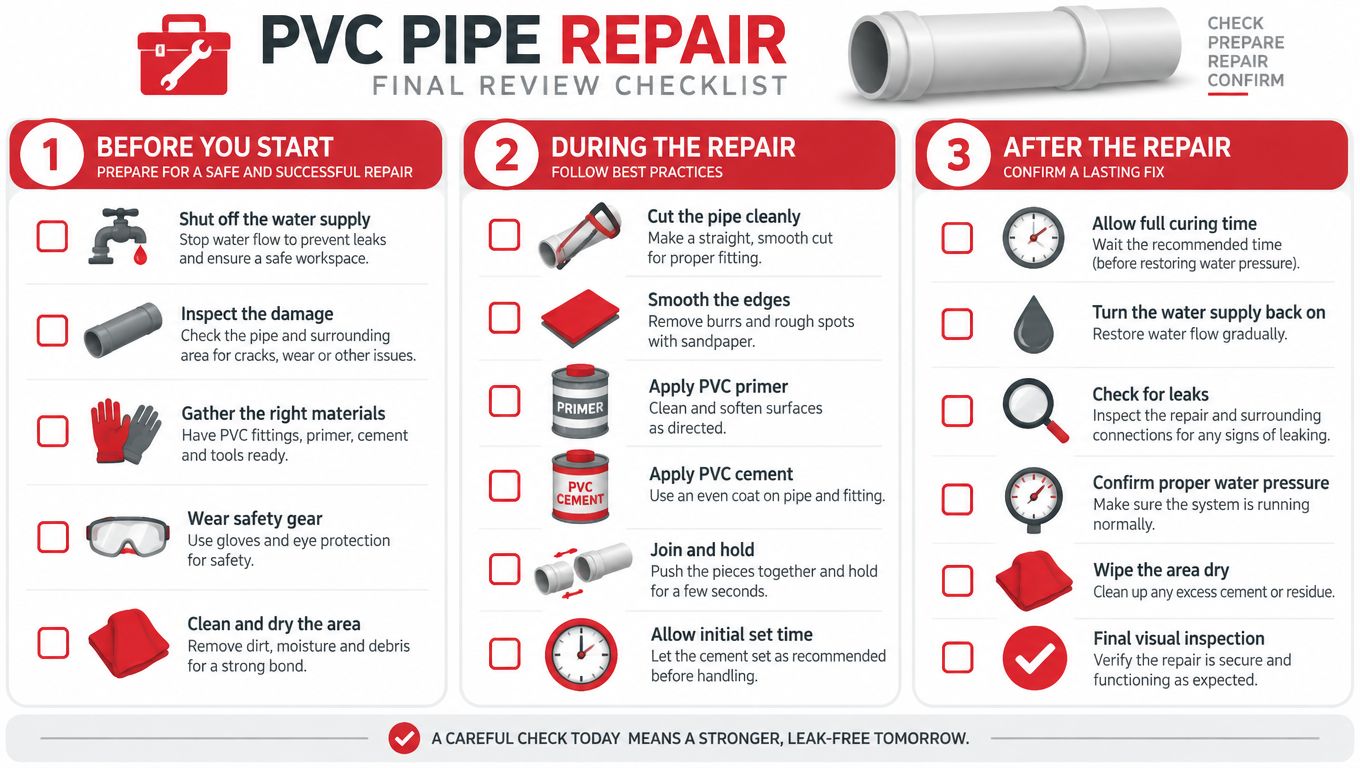
Your Final PVC Repair Checklist and Next Step
If the leak is active right now, shut off the nearest valve or the main, take photos, and check whether water has reached electrical components, baseboards, cabinets, or flooring. If the area spread beyond the pipe itself, plan for dry-out and inspection before you close anything back up. If you saw scale on the pipe or in fixtures, schedule a water-heater and pressure check so the next failure doesn't sneak up on you.
If the issue points to slab movement, a recurring pinhole leak, a PVC-to-cast-iron tie-in, or a line larger than 2 inches, hand it off without delay. Those are the jobs that cost more when they're handled as guesses instead of diagnoses. A properly solvent-welded PVC repair, done on the right pipe in the right conditions, outlasts temporary patches by decades.
MG Plumbing Services LLC handles residential plumbing repairs, leak detection, sewer and drain work, water pressure problems, and pipe replacement across the Las Vegas Valley. If you've got a PVC leak that needs real diagnosis instead of a quick patch, visit MG Plumbing Services LLC to request service from an owner-operated local plumber who works with hard-water, slab, and aging-pipe problems every day.