You shut off the garden hose, walk back inside, and assume the job is done. Later, you notice damp soil beneath the spigot, water tracking along the foundation, or a water bill that doesn't match your normal use. In Las Vegas, that small exterior drip deserves attention before it becomes a concealed pipe problem.
The U.S. EPA's WaterSense leak guidance says a faucet dripping once per second can waste more than 3,000 gallons per year. The same guidance reports that the average household leak wastes more than 9,300 gallons annually, while 9% of homes have leaks wasting 50 gallons or more per day. An outside faucet leak may look minor, but it can waste water and expose the wall, siding, framing, or foundation area to ongoing moisture.
The repair isn't always a washer replacement. Southern Nevada homes commonly deal with hard-water mineral buildup, aging hose bibbs, corrosion, pressure problems, and occasional freezing conditions. The right diagnosis identifies whether water is escaping at the washer, packing nut, vacuum breaker, valve stem, or wall penetration. The sections below cover the common failure points, a meter-isolation test, practical repair choices, winterizing, and the point where a professional diagnosis makes more sense than another hardware-store part.
Table of Contents
- Introduction to Outside Faucet Leaks
- Common Causes of Leaking Exterior Spigots
- Diagnosing Your Outside Faucet Leak
- Repairing Your Outside Faucet
- Winterizing Tips for Exterior Spigots
- When to Call a Professional Plumber
Introduction to Outside Faucet Leaks
A dark patch of soil beneath a shut-off spigot is often the first warning. In Henderson, the hose may be removed and the handle closed while water still collects at the foundation. In Summerlin, a slow spout drip may seem harmless because it happens outdoors. Both symptoms call for locating the escape point before ordering parts.
A practical rule saves time: find the leak location before buying the replacement part.
The visible symptom does not always identify the failed component. Water at the spout can point to the washer, while moisture around the handle suggests the packing nut or valve stem. A spray or drip at the faucet's top may involve the vacuum breaker. Water at the wall connection raises a different concern, especially if the supply line or connection is concealed inside the wall.
Las Vegas fixtures face hard-water deposits, heat, aging seals, and occasional freezing conditions. Mineral buildup can prevent a new washer from seating properly. A corroded stem or faucet body can make a hardware-store part swap a short-lived repair. A drip that continues for a week behind stucco can leave framing damp before paint, drywall, or trim shows any change.
Outdoor leaks also deserve attention because water can travel along the wall or foundation area rather than falling directly below the faucet. That makes soil moisture an imperfect guide. Check the spout, handle, vacuum breaker, wall penetration, and nearby shutoff while the fixture is both open and closed.
This article uses a field-tested diagnostic approach. It separates a straightforward washer or packing-nut repair from a failed vacuum breaker, damaged stem, concealed supply-line leak, or fixture that should be replaced instead of rebuilt. For broader residential leak context, see the EPA's residential leak information.
Common Causes of Leaking Exterior Spigots
Most online advice starts and ends with the washer. A washer is a common failure point, but it isn't the only one I check when diagnosing outside faucet leaks in Las Vegas homes. Hard-water deposits and corrosion can affect several parts at the same time, so replacing one rubber component may only postpone the next failure.
Washer and O-ring failures
A worn stem washer usually allows water to pass through the spout after the handle is shut off. An O-ring can create a similar symptom, depending on the faucet design. Rubber hardens, flattens, tears, or loses its sealing shape, especially in an older fixture exposed to heat and mineral buildup.
If the faucet drips from the spout after shutoff, the washer or stem seal is a reasonable starting point. But don't assume the washer is responsible if water appears around the handle or wall connection.
Packing nut and valve stem problems
The packing nut seals around the valve stem behind the handle. When that packing dries out, loosens, or deteriorates, water often appears at the handle while the faucet is open or closed. A slight tightening may stop a loose packing-nut leak, but forcing a heavily corroded nut can damage the stem or faucet body.
The stem itself can become pitted or corroded. In that situation, a new washer may seal briefly against a damaged surface and then begin leaking again. A seized stem is also a warning that the faucet may be near the end of its useful service life.
Vacuum breaker and wall penetration failures
A vacuum breaker protects the water supply from back-siphonage and sits near the spout on many hose bibbs. When its seal or body fails, water can drip from the spout after shutoff, even when the stem washer appears sound. Removing the hose before testing matters because an attached hose can hide or alter the symptom.
Water at the flange, where the faucet enters the wall, raises a different concern. The leak may involve the connection behind the wall, a cracked flange, or deteriorated sealing around the penetration. The Saving Water outdoor faucet guidance notes that leaks can originate at the packing nut, valve stem, vacuum breaker, or flange, and that sealing around a flange shouldn't trap water inside the wall.
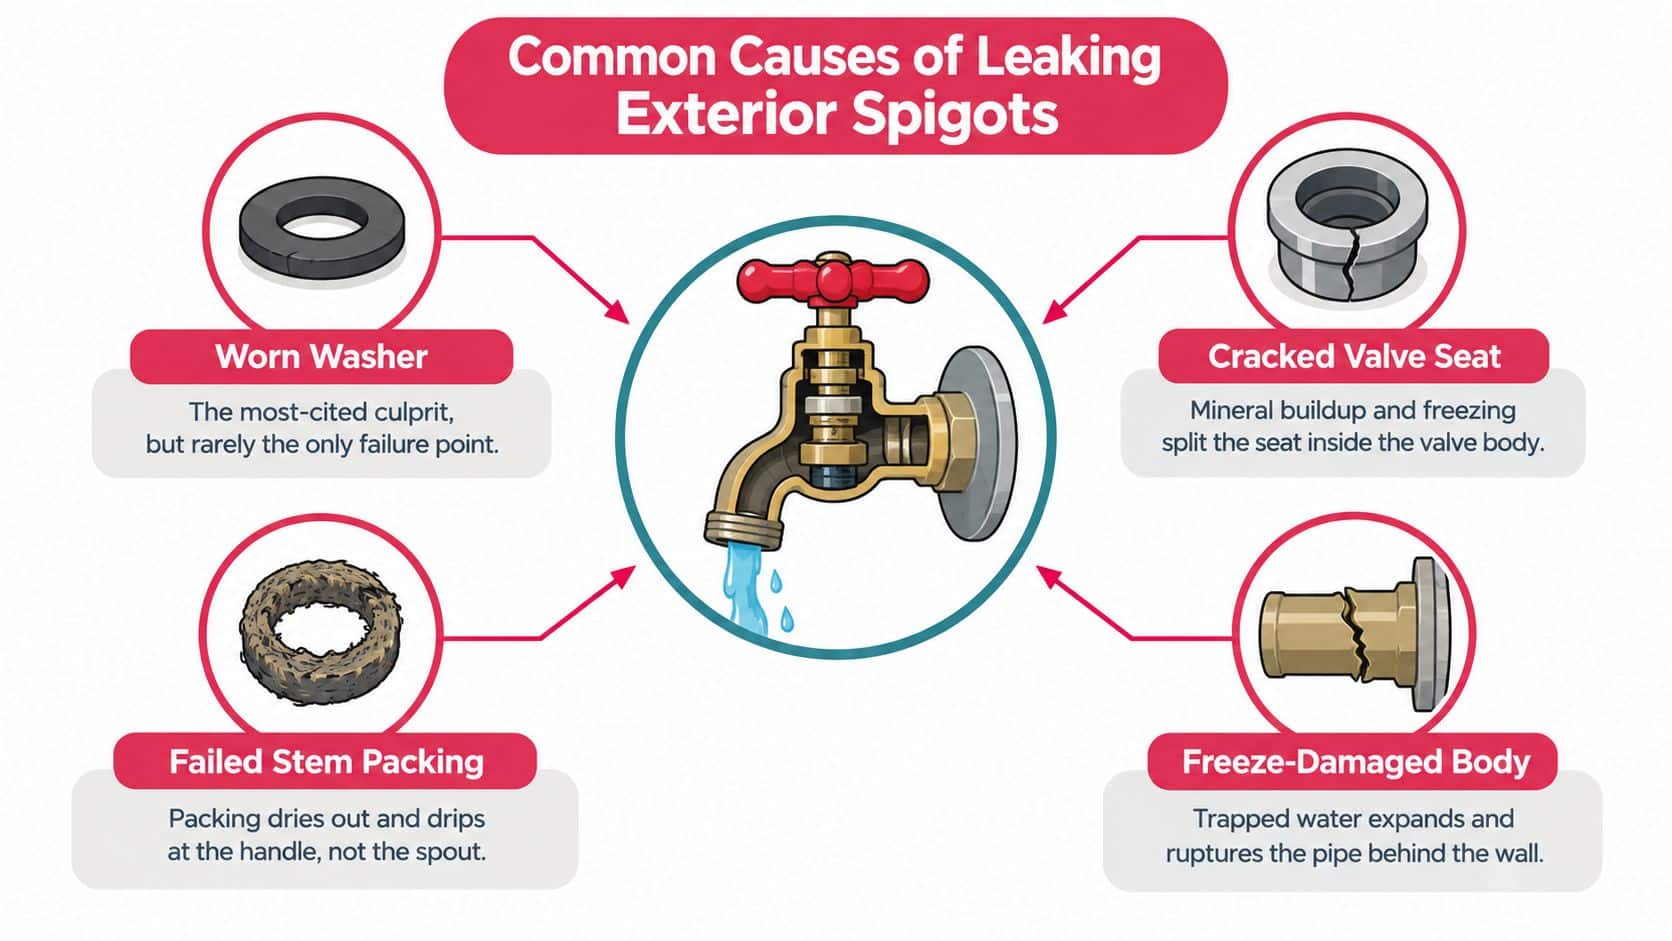
A heavily corroded faucet body, cracked connection, or recurring failure generally favors complete hose bibb replacement over repeated part swaps. The repair decision should follow the leak location and the condition of the fixture, not a generic parts list.
Diagnosing Your Outside Faucet Leak
Before turning a wrench, determine whether the leak is at the fixture or somewhere in the supply line. A reliable first step is a meter-isolation test, especially when the visible drip doesn't explain the amount of moisture around the home.
Start with the water meter
Shut off every interior and exterior water user. That includes faucets, toilets that may be refilling, irrigation, water-treatment equipment, and appliances that use water. Close the dedicated interior shutoff for the outdoor branch if the home has one, then record the meter reading.
Wait 2 to 3 hours and check the meter again, following the procedure described in Home Depot's leaky faucet repair guidance. Any measurable meter movement with all fixtures off indicates an active leak somewhere in the system. If the meter stops after the outdoor branch is isolated, the outside faucet or its supply line becomes the leading suspect.
Don't shorten the test for a slow leak. Also make sure the dedicated shutoff is fully closed. A partially closed valve can produce a misleading result.
Inspect three distinct zones
Look at the spout first. A drip that continues after shutoff points toward the washer, O-ring, stem seal, or vacuum breaker. Next, touch or visually inspect around the packing nut while the handle is off. Moisture that develops there usually calls for packing or stem attention, not a spout washer alone.
Finally, inspect where the pipe and faucet meet the wall. Water tracking backward along the pipe, damp masonry, wet soil, a sunken area, or water at the base of the exterior wall can indicate a concealed line break. That isn't the same repair as replacing an accessible washer.
For a broader assessment, MG Plumbing Services' water leak detection service addresses concealed and under-slab leaks with targeted diagnostic methods. The key is to establish the leak zone before opening the faucet or cutting into anything.
Repairing Your Outside Faucet
Once the leak location is clear, match the repair to the failure. A basic washer or O-ring replacement is often manageable for a careful homeowner. A corroded fixture, damaged wall connection, or concealed line requires a different level of access and risk.
Match the symptom to the repair
| What you observe | More likely repair path |
|---|---|
| Drip from the spout after shutoff | Inspect and replace the washer, O-ring, stem seal, or vacuum breaker |
| Moisture around the handle | Tighten the packing nut slightly or replace the packing |
| Water at the wall flange | Inspect the connection and wall penetration before sealing or replacing |
| Cracked or heavily corroded body | Replace the complete hose bibb |
| Wet soil or wall base with the faucet closed | Isolate and locate the concealed supply-line leak |
Start by shutting off the branch valve, opening the outside faucet to relieve pressure, and removing the handle. Take a photo before disassembly. That small step helps you remember the order and orientation of the handle, stem, packing nut, and washers.
For a washer or O-ring repair, use an adjustable wrench and screwdriver appropriate to the fasteners. Remove the stem assembly carefully, compare the replacement part with the old one, and clean loose mineral deposits without damaging the sealing surfaces. A new washer won't solve a heavily scored seat or a badly pitted stem.
A loose packing nut may need only a small adjustment. Tighten gradually, then operate the handle and check for moisture. If the nut is seized, use penetrating oil and steady force rather than sudden pressure. Excessive force can twist the pipe behind the wall.
A failed vacuum breaker is easy to miss. If the spout drips after shutoff and the stem components look serviceable, inspect the breaker and replace it with the correct model for the faucet. If the fixture body is cracked, the flange is damaged, or the same leak returns after repeated component replacements, stop buying parts. Full replacement is usually the more dependable repair.
For written information about exterior replacement options and other residential work, see MG Plumbing Services' cost estimates. The estimate should identify whether the job involves a component repair, complete hose bibb replacement, or access to piping behind the wall.
Winterizing Tips for Exterior Spigots
Las Vegas doesn't have the same sustained winter conditions as northern states, but occasional freezes still expose weak outdoor plumbing. A frost-free hose bibb only works as intended when the line can drain. Leaving a hose attached traps water inside the fixture and can turn a protected spigot into a freeze-damage risk.
Complete the fall shutoff
Find the interior branch valve supplying the outdoor faucet and close it before a hard freeze. Disconnect the hose, remove any splitter or timer, and store them indoors. Then open the exterior faucet so residual water can drain from the branch.
Inspect the spigot while it's open. Look for a split body, a crack near the wall, a loose connection, or water that continues after the branch valve is closed. Exposed pipe in a garage, crawl space, or other unheated area should receive a properly fitted foam insulation sleeve, while the faucet itself can receive an insulated cover where appropriate.
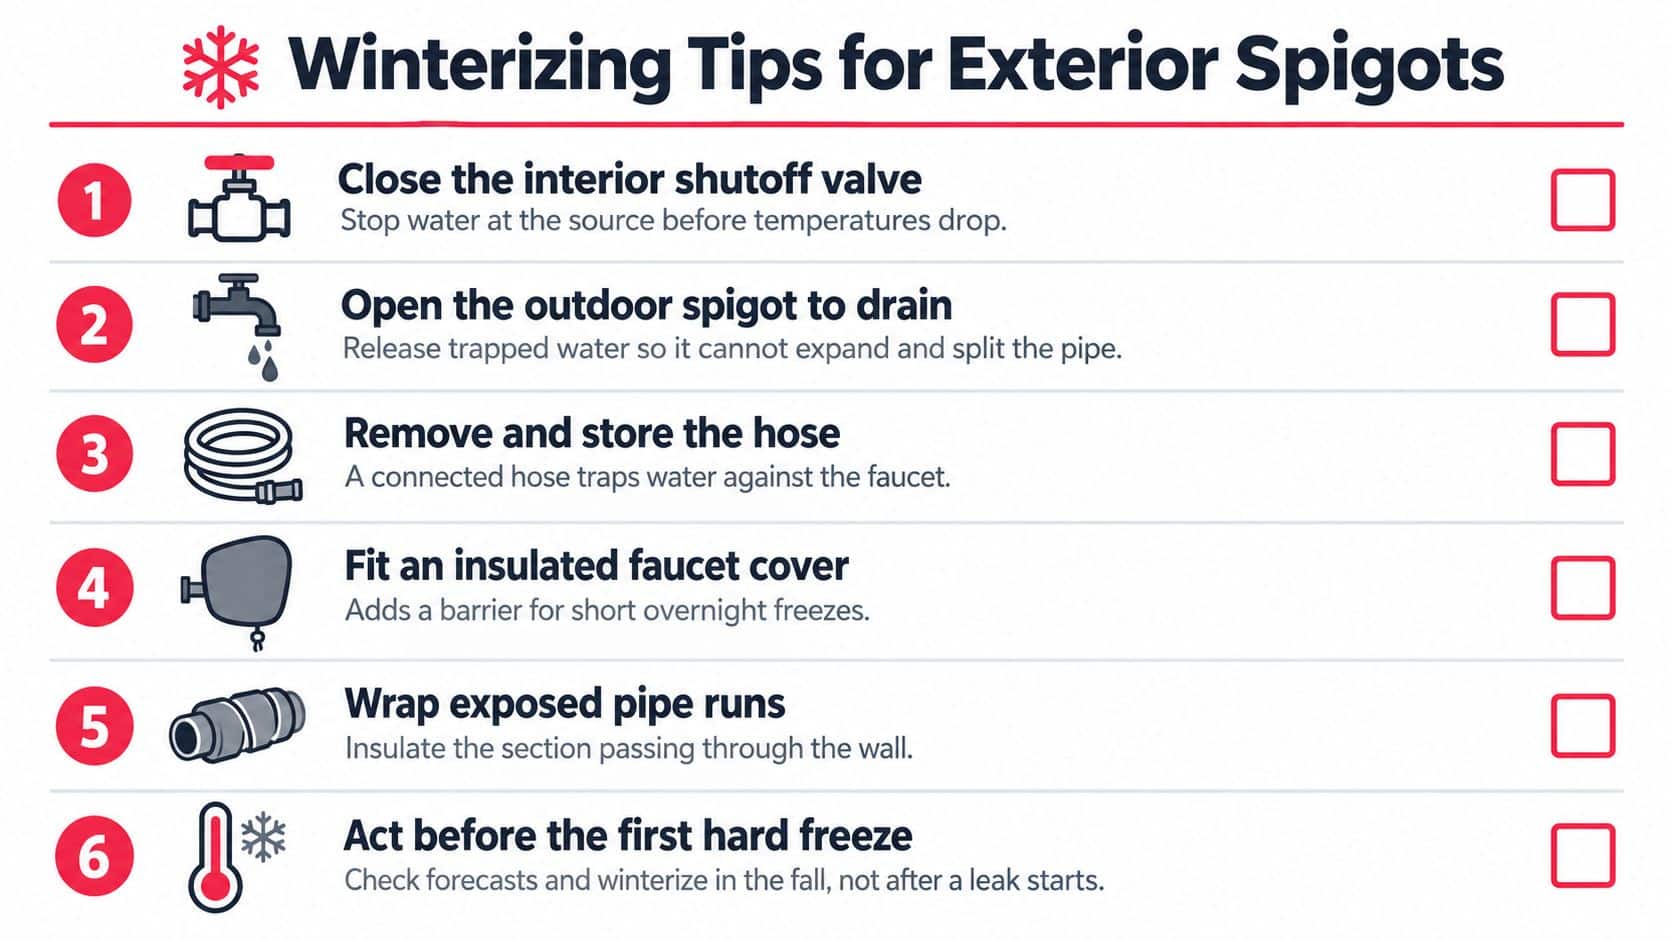
A cover adds protection, but it can't compensate for a closed-off drain path or a hose left connected. The winter damage guidance for outdoor faucets also emphasizes that trapped water can freeze and reveal cracks when the faucet is used again.
Use a short annual checklist
- Close the interior valve: Stop water at the source.
- Open the outdoor spigot: Drain residual water from the branch.
- Remove the hose: Don't leave attached equipment trapping water.
- Inspect the body: Look for cracks, corrosion, or unexplained moisture.
- Insulate exposed piping: Protect pipe passing through an unheated area.
- Check before freezing weather: Complete the work before temperatures fall sharply.
This routine takes little time and gives you a chance to find a weak faucet while the repair is still straightforward. If the spigot leaks when reopened, don't keep operating it to see whether the problem improves. A freeze-damaged connection can send water into the wall as soon as pressure returns.
When to Call a Professional Plumber
DIY makes sense for a clearly identified washer, O-ring, or lightly loose packing nut. It becomes a poor trade-off when the evidence points beyond the faucet body. Wet soil, a sunken area, water at the wall base, or a meter that advances after the outdoor branch is isolated can indicate a concealed line leak that needs proper locating equipment.
Call a licensed plumber when the leak returns after multiple part replacements, the faucet body is heavily corroded, or an older frost-free bibb has internal deterioration. Replacement is often more reliable than rebuilding a fixture whose threads, stem, or body can no longer provide a sound seal.
Pressure also matters. Residential water pressure above 80 PSI can damage an outside faucet, and common guidance places normal residential pressure at about 45 to 80 PSI, according to pressure and hard-water plumbing guidance. A pressure-regulating valve may be needed when excessive pressure is driving repeated failures.
Know when to stop: A new washer can't correct a concealed pipe break, damaged wall connection, or pressure problem.
In the Las Vegas Valley, MG Plumbing Services LLC is a local, family-owned, owner-operated residential plumbing company serving Las Vegas, Henderson, North Las Vegas, Summerlin, and surrounding communities. Owner Miguel Garcia is a Nevada-licensed C-1d plumbing contractor and journeyman plumber with more than 25 years of experience. The company uses professional leak-detection equipment and provides straightforward recommendations, including written pricing before work begins. For a deeper problem, request same-day plumbing service in Las Vegas during business hours.
If your outside faucet is dripping, leaking at the handle, or leaving wet soil near the wall, MG Plumbing Services LLC can diagnose the faucet, supply line, pressure, or concealed leak and recommend repair or replacement. Visit MG Plumbing Services LLC or call 702-480-8070 to request residential service in the Las Vegas Valley. Se habla español.